Dave rock explains when your hondas has no spark , this is usually whats wrong.
Friday, May 28, 2010
Friday, May 21, 2010
Moments in the repair shop!

This week we have Ron Ananian known as the "Cardoctor" with a story he calls "Moments that make up the day in the repair shop". Listen to the audio clip below.
Friday, May 14, 2010
Diagnostics Fee or Diagnostics Free


 This week we have an article written by "Gonzo" entitled "Diagnostics Fee or Diagnostics Free". Gonzo says, I can’t tell you how many times I’ve heard the same lines from customers after I have diagnosed a problem: “Well, I could have done that myself,” “I would have looked there for the problem if I had the time” or “I don’t know why you’re charging me for something so simple.”
Read the whole story at ..http://www.underhoodservice.com/Article/72105/diagnostics_fee_or_diagnostics_free.aspx
Scott “Gonzo” Weaver is a member of our mailing list on carfix_online.
Tuesday, May 11, 2010
Diagnostic Tech: '91 Cutlass Ciera No-start
A '91 Olds Cutlass Ciera w/3.3 engine that intermittently will stall and not start.
Sometimes you just have to see if the car will work with you so I let it sit and idle in the work bay. It wasn't long at all before the car cut out a couple times and stalled. It would start, then stall, start then stall... until finally a crank with no start. Experience would say to notice if the service engine light works with the key. It does. Now the things to know are if there is ignition spark, fuel pressure and injector signal but I want to go to something that gets a bad rep for no good reason and show you just how useful it can be. The diagnostic trouble tree. Yes you can follow a diagnostic tree completely and fully only to find no final answer or even a wrong answer but if you carefully use the tree it can be a learning tool. You have to do more than follow each step mindlessly. You have to get pro-active and think about what you are being asked to do, how it will help and what it tells you. Once you do that the diagnostic steps become lessons in learning the system you are testing.
A no-start trouble tree for GM is Chart A-3. I still have an old OTC Tools and Techniques manual that covers '91 GM models. These were some excellent manuals published by Mitchell several years ago. This is a PFI fuel system with C3I ignition so page 47 in the manual.
 Now it took me a long time to get used to repair information on computer and I held on to the books as long as I could but the time came long ago that electronic repair information is more cost effective and practical. That being said, we'll pull up an Alldata diagnostic chart as well.
http://www.screencast.com/users/Styxxed/folders/Default/media/6c1035bc-db97-412f-90b5-f46efb5678ea
If we start with the Mitchell chart we'll see a suggestion to look the system over under the hood. Inspect vacuum hoses, plug wires and connections. Not a bad idea but the car was sitting here running fine until it cut out and stalled. So I'm not going to spend a lot of time looking for broken vacuum hoses or leaky plug wires. Checking connectors is good but I'm not going to get deep into that either. Initially we want to get right to the heart of the matter and if I'm not getting spark or fuel because of a bad connection it will show up later too. A quick once over and those things look good enough to me. Next is to remove the plugs for inspection. Well I'm not going to do that at this point either. If I have spark to the plugs at the wires, fuel pressure to the rail and injector signal then it would make more sense to pull the plugs and look for fouling preventing them from firing. But again, the car was running and did not flood out. It just stalled suddenly so we'll skip the plug removal. As long as we are aware of what steps we are performing and what we aren't, as long as we continue in a logical approach and step by step, we'll get some useful testing done. Notice how the testing tree does teach a logical approach, even if we aren't using every suggestion as presented. It says look for obvious problems, then begin ignition system inspection with the spark plugs. Instead of plugs we'll look for ignition spark at the wires. I'm going to take a simple adjustable spark tester, open the gap wide so that I know there is plenty of power in the spark and run a plug wire to the tester.
 When I crank the engine I see a good spark across that gap. For now, I'm finished checking the ignition system. It gets a tentative pass from me. Bear in mind that for all we know that one coil tower is the only one on the car firing. The repair manual suggests looking for spark at each coil but we are not going to do that. I still want to know if I have fuel delivery. Let's don't get tied down to one aspect of things until we have a good overview. It isn't difficult to test fuel pressure on this car. There is a schrader valve in the fuel rail and my pressure gauge has a fitting made to fasten to that valve. It is more convenient though to put a noid light in an injector connector and see if I have injector signal. I'll save the fuel pressure test for later. When I crank the engine and see no flashing noid light I have found where to start sinking my teeth.
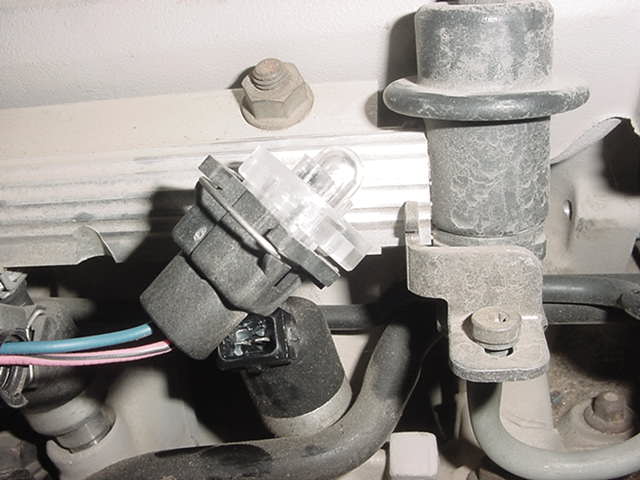
The OTC/Mitchell manual has pointed through ignition testing first and though we made adjustments to that trouble tree we are now at the point to begin fuel system tests. The Alldata chart just happens to begin with injector noid light testing so we can go to that one for a bit. Since we have no flash from the noid light we need to see if we have power to the pink/black wire. This same wire powers the ignition module and we do have spark but according to the wiring diagram the ignition feed could be good and a problem further down the circuit still keep the injectors from receiving power. A test lamp at the injector connector is what I use. A meter would show if there was voltage but a test lamp will pull current to light the bulb. The current draw can show a poor connection where a meter would not. Anyway, this circuit looks to be good. That means we have no flashing noid light because of a problem on the ground side of the injector circuit. Ground is provided to the injectors by the engine computer and pulsed according to the amount of "on" time the computer determines is needed. At this point our Alldata tree suggests to remove the connector from the ignition module and to test for power on the pink/black wire. We can skip that because the car has ignition spark and since the pink/black wire is the ignition power wire it must have power.


You can disconnect the module connector, take a test light lead and connect to the positive battery post, touch the probe tip to the purple/white wire at pin c and simulate the signal closely enough that the computer thinks it is the same thing. The ecm is just looking for a signal voltage. It has no idea where it came from.

I just find that interesting. Comes in handy at times as well. You can use that same method to simulate a pickup coil signal to the module in an old HEI distributor system.
Back to the problem at hand. We want to know that the wires from the injectors to the ecm are good. These injectors are bank fired. One bank is triggered by the dark blue wire at ecm pin C11. The other by dark green at pin C12. Since we have power to the injectors on the pink/black wire with the key on then all we have to do to see that the wiring is intact to the ecm is to use the test light at C11 and C12 to verify the circuit. The lamp should light. It does. At this point the Alldata tree suggests replacing the ecm. Before doing that I would suggest testing ecm powers and grounds. Another glaring hole for me is that I have not looked at sensor datastream or engine codes. It is very possible for a sensor to cause no injector pulse as part of a programming design. For instance, a throttle position signal that indicates full open throttle on crank and the car will go into clear flood mode with no injector signal. A coolant temperature signal that indicates extremely hot conditions can cause the ecm to lean the fuel mix so much that there is little or no injector signal. Now every computer circuit can be tested at the ecm with a scope or meter but it is time consuming and what you really want to know here won't be found that way. What you want to know falls into the strength area of a scan tool. You want to know what the ecm thinks the sensor data is, what it thinks the voltages are on its connector circuits. That tps signal could be perfectly normal tested with a meter but it is possible for the ecm to be misreading the signal and that is what you can see with a scan tool datastream. So before replacing this ecm we'll look at powers, grounds, datastream and codes. One more thing, we need to test the resistance of the injectors while the no-start is present. A shorted injector could shut down the driver circuit.
I don't see any problems so we'll do the ecm swap. It is fairly simple. The ecm is behind the glove box but I already have it out for testing access. Just disconnect the wiring, remove the access cover. You need to remove the PROM from the old ecm and put it into the new. It contains the programming information for the particular car.


Now back in the olden days (heh, heh), I would check the PROM for available updates. We had no flash PROM then. Read the scan tool PROM ID or use the physical number on the PROM and check in the manual. AXAU 9718 is the PROM number and is the latest update for this application. Good thing because I doubt new PROMs for these old cars are still available.
I got the ecm connected and the car cranked right up. Just button it all up and we're done. Thanks for reading and hanging out with me. I hope you learned that even though we made modifications to the published diagnostic procedures and streamlined things a bit to get a result quicker, we were still doing the same thing. Following a trouble tree of our own design to approach the problem in a logical manner. That's what it is all about.
Kenneth Hayes
AKA Deranger
Sunday, May 09, 2010
Duct tape Datsun... Early morning de-"Light"
Another story from my best selling book
Hey Look I Found The Loose Nut
availabe from Amazon.com, Borders, or at my website www.gonzostoolbox.com where you'll find even more stories and even more things to do.
A few years ago a nurse dressed in her scrubs came into my Tulsa auto-electric shop early one afternoon. She had just finished her morning shift at the hospital. She told me that things were kind of tight at her house financially, and she didn’t have a lot to spare for car repairs. I told her I would help her out as much as I could.
Her problem was that her headlights didn’t work, and she really needed to take her old Datsun (Dats before Nissan) to work in the early morning hours, regardless whether or not she got a ticket for having no headlights. She explained that she had to leave for work at ‘Oh-dark-thirty,’ as we used to say in the Marines, so I was thinking she had some sort of lighted route that would keep the prying eyes of the law off her tail.
“I get the picture, Ma’am. I’ll take a look at it,” I said.
Now I’m no car snob but I was genuinely suprised at how decripit this has-been automobile she was driving was. It should have been crushed years earlier, although it looked pretty much all biodegraded already—completely rusted and dented up with not much left of the interior. But as it was, this was this nice lady’s only ride to-and-from work. Yes, she would wait to see what I found.
Rather than surveying the outside any longer than necessary, I popped the hood and got right to work on finding the problem. It wasn’t that hard to find. At the positive battery post on this type of car was a series of fusible links that powered up different systems in the car. One of them was corroded off the terminals. It just so happened to be the one that powered the headlights.
I grabbed the trusty baking soda and cleaned off the crud from the positive post of the battery. After replacing the corroded end of the fusible link, I attached it back onto its proper post. One flick of the headlight switch and she was in business.
I went into the lobby and told the nurse, who was waiting anxiously, what I had found. I told her that it was going to be a cheap fix, and not to worry about having to get a car-fix loan (as she had worried aloud to me). I then asked her how long had she been driving around with no headlights.
She told me with an air of satisfaction, “Oh, I had headlights all the time. I just wanted the factory ones to work because I was getting tired of changing the batteries in the other ones.” Say what?
Factory ones? Batteries? What other ones? Did I miss something?
I just stared at her for a few seconds. I thought that by now I was pretty good with electrical systems. What did I miss on this old Datsun’s electrical schematics that involved alternate headlights that she was aware of, but I wasn’t?
“Really?” I said. “Can you show me what you are talking about?”
We walked out to the car and there on each edge of the front bumper were two 9-volt flashlights duct-taped around the bumper with what could have been a whole roll of tape. She walked up to them and pushed the button on each of the right and left flashlights. Then she turned around to face me with both arms out stretched like a TV ad model; pointing one toe and all. And wouldn’t you know it… she’s got headlights, sort of.
“I just thought it was going to cost so much to fix them that I have been putting it off for months,” she said. “But I had to buy so many batteries I thought it would be cheaper to find out what was really wrong with the factory ones.”
Now I’ll admit I’ve never seen duct-taped flashlights attached to a bumper before. And I haven’t seen them since... But I’ll tell you this, if I’m ever in need of a nurse in an emergency, who can get the job done till the cavalry comes, she is my choice. Way to go girl. You got my vote for duct-tape engineer of the month.
Sunday, May 02, 2010
Stories from my book "Hey Look, I Found The Loose Nut"
Bottom Shocker:
A customer called [my auto electric shop] and said he just purchased a car from the police auction, but it had some sort of strange noise coming from the driver’s side electric seat. It seems every time he moved it there was a strange electrical sound. He thought there was something wrong with the seat motor.
He was coming to me, an auto electric technician, to get it fixed.
“Sure,” I said. “What kind of car is it?”
“It’s a Peugeot,” he answered.
I’m not much on Peugeots, but I told him I could take a quick look at it and see if I could do anything for him.
A day or so later the car arrived at the shop. After pulling it into a bay I tried the driver’s seat. Sure enough, as you moved the seat forward an inch or two, a horrible loud buzzing of electricity emanated from under the seat. Rolling the seat back would stop the noise. Well then, what to do? I rolled the seat forward to the spot that made the noise. It seemed to be pretty consistent, same place, same noise. When I moved the seat to the spot that made the noise I got out of the car and looked underneath. The noise immediately stopped … nothing, not a whisper of any strange noise or buzzing.
The car had an all black interior, black seats, black carpet; even the seat rails and brackets were solid black. It looked fine to me. Of course it’s still a Peugeot, and I just don’t go poking my head under Peugeot seats every day, so I must’ve been missing something.
I rolled the seat forward and back several times and still no noise. What in the world was going on?
I called over my helper and told him “Listen to this, see what you think.” The noise was gone. I explained to my helper what had happened. He was at a loss. I climbed back in the car and, sure enough, as long as I was sitting in the seat, it would make the noise. Getting back out of the car and trying it, nothing. Sit in the car and the noise happened every time. This is ridiculous. I heard the sound myself and I’m not going crazy, am I?
I got out again, but this time I had my helper get in and move the seat. He moved the seat forward and within a few inches it starting making the noise. I told him to lift his butt out of the seat…the noise stopped immediately. He tried several times. I tried a couple of times. We didn’t think anything of it. Actually, we were having fun with it. One of us would sit in the seat and make a fake pistol with our fingers as if we were shooting each other. Raise and lower our butts in and out the seat and play like we were Buck Rogers or something.
“OK, enough fun, sit back down,” I said, “I’ll look underneath this time.” I got down to where I could look under the seat at about the same time he was putting his weight back into the cushion. Then I saw the problem. Oh my! I had to look again and again just to make sure I was seeing what I thought I was seeing.
My helper asked: “What is it?” with great surprise and anticipation. As I looked underneath the seat I could see a perfect bluish white lightning bolt glow about an inch or so long. It was pointed right at the bottom of the cushion but only a fraction of an inch from the metal bracing of the seat.
In a very calm voice I told him, “Now listen carefully, I want you to raise your butt out of the seat, and I’ll move the seat towards the rear. There is a police taser pointing at your keister right now. Move very carefully, and I don’t think you’ll get shocked.”
I think it shook him up a bit. But he carefully lifted his weight out of the seat. The taser was the exact same color as the carpet and under side of the seat. It was so well camouflaged that it appeared to a part of the seat mechanism. If it wasn’t for the lightning bolt, I don’t think anyone could have spotted it. It really looked like a part of the seat brackets. After moving the seat back, the taser eased off of the button and came back to rest with the business end pointing harmlessly away from his “derriere.”
I then reached under the seat and pulled the butt buzzer out from under the seat. I called the customer and told him what I found. To say the least he was shocked.
So were we for that matter… well, almost.
Subscribe to:
Posts (Atom)