 John Davis and Pat Goss talk about Ford's new Explorer for 2011 with EcoBoost. Listen by clicking on the link below.
Friday, September 17, 2010
New Ford Explorer with EcoBoost
John Davis and Pat Goss talk about Ford's new Explorer for 2011 with EcoBoost. Listen by clicking on the link below.
Friday, September 10, 2010
Dave Rock's Redneck Rollercoaster
Those of you that follow this blog have seen Dave Rock explaining how things work and practical fixes that you just might not find in a book! Well here is another one, perhaps Dave's most famous video's as he describes how he made the Redneck Roller coaster several years ago. Being a machinist sure helps with these projects.
When your done seeing the "how to video", then view the video at the bottom, which really shows why it is named "roller coaster! Yes , it is driven from way up top!
When your done seeing the "how to video", then view the video at the bottom, which really shows why it is named "roller coaster! Yes , it is driven from way up top!
Friday, September 03, 2010
Replace piston rings in a kawasaki commercial mower
 Have you ever wondered what would it be like to replace the piston rings in your lawn mower or small gasoline engine? Well, this week Dave Rock shows us the procedure in this lengthly video.
Goss & Gonzo on the Radio show
Pat Goss had Scott "Gonzo" Weaver on the show recently and they talk about gonzo's book, and other auto related matters " The Title of the book is
"Hey Look! I Found the Loose Nut!" which can be bought at
http://www.gonzostoolbox.com/Buy-iit.html
"Hey Look! I Found the Loose Nut!" which can be bought at
http://www.gonzostoolbox.com/Buy-iit.html
Friday, August 27, 2010
A television part fixes a bad alternator
 Dave Rock shows you how he used a part out of a tv set to fix a problem with the alternator, that also effected his wipers on his Caravan.
Spring clamps OEM type VS. Worm clamps
 This week Pat Goss answers a callers question about what type of clamp should one use when changing a water hose clamp. Is it ok to use the same spring clamp (OEM)that that you took off, or must you buy new, or use a worm clamp?
Friday, August 20, 2010
Making of the Model T Ford- DON'T MISS THIS ONE!!!
This is a great video showing the first assembly lines at the original Ford auto plant. Neat to see those guys making the old wooden wheels, by hand mostly... The places that car could go...is amazing!
What is Tire Cupping?

This week Dale Donovan has a new video on what is tire cupping and the causes of it.
Friday, August 13, 2010
Identify this song?
 ,
,This song is heard every week on one of the Car Shows heard over the radio. What is the name of the song and the artist and if you know what show is it used for every week for the opening theme music?
Send your answer to the carfix_online mailing list!
Join our mailing list to find the name of this song. Send email to:
carfix_online-subscribe@yahoogroups.com
Click below to listen to it!
Thursday, August 12, 2010
How to change bearings and brakes on suzuki z400 atv
Dave Rock makes it look so easy in this video. No special tools, as you will see, he just "wings" it and gets the job done. Wouldn't it be nice if all jobs were like this!
Friday, August 06, 2010
Web Site for buying Ford Parts
 Pat Goss talks about the new web site for buying Ford Parts with his guest.
http://www.fordparts.com/
Friday, July 30, 2010
Tom Torbjornsen on Hour Meters/Oil Life Monitors
 A few weeks ago we had a debate going on the list about the question whether using an hour meter on automobiles is a better way to do preventative maintenence rather then the conventional way, based on miles driven or months. I asked automotive expert Tom Torbjornsen this very question and in the audio segment below he gives us his answer, plus he gives us a little extra information on oil changes in the first audio clip below.
Tom also goes into oil life monitors and I have included some of what he had to say about that along with an interesting story he tells in the second audio clip.
Tom is an ASE certified technician, and been in the business for over 35 years!
Friday, July 23, 2010
AVOIDING FLEAS! Don't look for the cheapest price!
 My Grandmother was always concerned about the character of the people I hung with. She used to say “remember young man if you sleep with dogs you wake up with fleas.” That sounded pretty silly at the time but through the years I’ve gained an understanding of what she really meant.
Listen to the audio clip as Pat tells the rest of this story!
Friday, July 16, 2010
Fix and start some weedeater string trimmers
 Have some Gas string trimmers around but don't know how to fix them? Dave Rock to the rescue this week as he shows you how to fix them. Very practical and of course cheap!
Friday, July 09, 2010
Pets in automobiles-Be careful!
 I know we have a lot of animal lovers out there, so this week I have another Pat Goss audio in which he discusses with his guest a local veterinarian, why you must not leave a dog or pet in a vehicle, even for a short period of time.
To listen click on the audio clip below.
Friday, July 02, 2010
The Mythbusters test various car myths

The mythbusters expose some common myths about automobiles. Some turned out to be true and some were false. As you watch this fairly long episode in two parts see if you can determine how each one will turn out!
Friday, June 25, 2010
What is computer reflashing?
This week Ron  Ananian discusses computer reflashing as he interviews a specialist from Bosch. Listen to the audio clip below.
 Ananian discusses computer reflashing as he interviews a specialist from Bosch. Listen to the audio clip below.
Friday, June 18, 2010
Car Maintenance with lauren fix
This week Lauren Fix (The car coach)is back with some Car Maintenance tips! Lauren explains how the truth about her last name "fix" and what the stuff called "Purple Ice" is.
http://www.myfoxdc.com/dpp/mornings/holly_live/holly-morris-car-maintenance-tips-041410
http://www.myfoxdc.com/dpp/mornings/holly_live/holly-morris-car-maintenance-tips-041410
Friday, June 11, 2010
Preventive maintenance- more than an oil change!

This week Pat Goss tells us why you need more then just quick service oil changes and the need for full service on your vehicle.
Listen by clicking on the audio clip below.
Friday, June 04, 2010
How to change tires for off road vehicles
This week Dave Rock shows us a technique on how to remove a tire from the rim of an atv , lawntractor, motorcycle tire. No special tools needed, except for the ATV tire removal which he explains why you might not be able to do this one, as the bead is a little different on these!
Friday, May 28, 2010
When your hondas has no spark , this is usually whats wrong.
Dave rock explains when your hondas has no spark , this is usually whats wrong.
Friday, May 21, 2010
Moments in the repair shop!

This week we have Ron Ananian known as the "Cardoctor" with a story he calls "Moments that make up the day in the repair shop". Listen to the audio clip below.
Friday, May 14, 2010
Diagnostics Fee or Diagnostics Free


 This week we have an article written by "Gonzo" entitled "Diagnostics Fee or Diagnostics Free". Gonzo says, I can’t tell you how many times I’ve heard the same lines from customers after I have diagnosed a problem: “Well, I could have done that myself,” “I would have looked there for the problem if I had the time” or “I don’t know why you’re charging me for something so simple.”
Read the whole story at ..http://www.underhoodservice.com/Article/72105/diagnostics_fee_or_diagnostics_free.aspx
Scott “Gonzo” Weaver is a member of our mailing list on carfix_online.
Tuesday, May 11, 2010
Diagnostic Tech: '91 Cutlass Ciera No-start
A '91 Olds Cutlass Ciera w/3.3 engine that intermittently will stall and not start.
Sometimes you just have to see if the car will work with you so I let it sit and idle in the work bay. It wasn't long at all before the car cut out a couple times and stalled. It would start, then stall, start then stall... until finally a crank with no start. Experience would say to notice if the service engine light works with the key. It does. Now the things to know are if there is ignition spark, fuel pressure and injector signal but I want to go to something that gets a bad rep for no good reason and show you just how useful it can be. The diagnostic trouble tree. Yes you can follow a diagnostic tree completely and fully only to find no final answer or even a wrong answer but if you carefully use the tree it can be a learning tool. You have to do more than follow each step mindlessly. You have to get pro-active and think about what you are being asked to do, how it will help and what it tells you. Once you do that the diagnostic steps become lessons in learning the system you are testing.
A no-start trouble tree for GM is Chart A-3. I still have an old OTC Tools and Techniques manual that covers '91 GM models. These were some excellent manuals published by Mitchell several years ago. This is a PFI fuel system with C3I ignition so page 47 in the manual.
 Now it took me a long time to get used to repair information on computer and I held on to the books as long as I could but the time came long ago that electronic repair information is more cost effective and practical. That being said, we'll pull up an Alldata diagnostic chart as well.
http://www.screencast.com/users/Styxxed/folders/Default/media/6c1035bc-db97-412f-90b5-f46efb5678ea
If we start with the Mitchell chart we'll see a suggestion to look the system over under the hood. Inspect vacuum hoses, plug wires and connections. Not a bad idea but the car was sitting here running fine until it cut out and stalled. So I'm not going to spend a lot of time looking for broken vacuum hoses or leaky plug wires. Checking connectors is good but I'm not going to get deep into that either. Initially we want to get right to the heart of the matter and if I'm not getting spark or fuel because of a bad connection it will show up later too. A quick once over and those things look good enough to me. Next is to remove the plugs for inspection. Well I'm not going to do that at this point either. If I have spark to the plugs at the wires, fuel pressure to the rail and injector signal then it would make more sense to pull the plugs and look for fouling preventing them from firing. But again, the car was running and did not flood out. It just stalled suddenly so we'll skip the plug removal. As long as we are aware of what steps we are performing and what we aren't, as long as we continue in a logical approach and step by step, we'll get some useful testing done. Notice how the testing tree does teach a logical approach, even if we aren't using every suggestion as presented. It says look for obvious problems, then begin ignition system inspection with the spark plugs. Instead of plugs we'll look for ignition spark at the wires. I'm going to take a simple adjustable spark tester, open the gap wide so that I know there is plenty of power in the spark and run a plug wire to the tester.
 When I crank the engine I see a good spark across that gap. For now, I'm finished checking the ignition system. It gets a tentative pass from me. Bear in mind that for all we know that one coil tower is the only one on the car firing. The repair manual suggests looking for spark at each coil but we are not going to do that. I still want to know if I have fuel delivery. Let's don't get tied down to one aspect of things until we have a good overview. It isn't difficult to test fuel pressure on this car. There is a schrader valve in the fuel rail and my pressure gauge has a fitting made to fasten to that valve. It is more convenient though to put a noid light in an injector connector and see if I have injector signal. I'll save the fuel pressure test for later. When I crank the engine and see no flashing noid light I have found where to start sinking my teeth.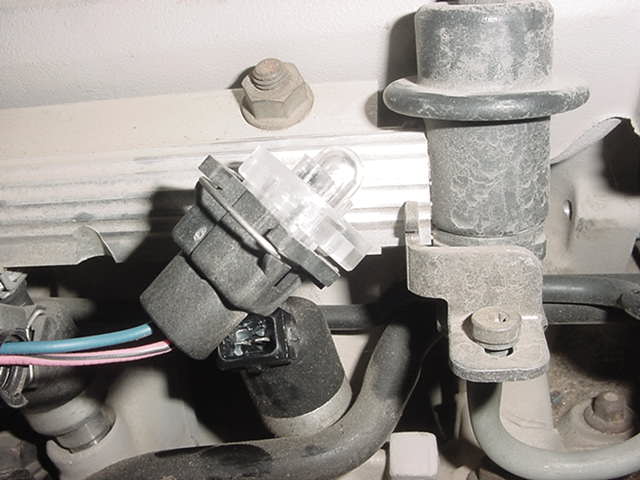
The OTC/Mitchell manual has pointed through ignition testing first and though we made adjustments to that trouble tree we are now at the point to begin fuel system tests. The Alldata chart just happens to begin with injector noid light testing so we can go to that one for a bit. Since we have no flash from the noid light we need to see if we have power to the pink/black wire. This same wire powers the ignition module and we do have spark but according to the wiring diagram the ignition feed could be good and a problem further down the circuit still keep the injectors from receiving power. A test lamp at the injector connector is what I use. A meter would show if there was voltage but a test lamp will pull current to light the bulb. The current draw can show a poor connection where a meter would not. Anyway, this circuit looks to be good. That means we have no flashing noid light because of a problem on the ground side of the injector circuit. Ground is provided to the injectors by the engine computer and pulsed according to the amount of "on" time the computer determines is needed. At this point our Alldata tree suggests to remove the connector from the ignition module and to test for power on the pink/black wire. We can skip that because the car has ignition spark and since the pink/black wire is the ignition power wire it must have power.


You can disconnect the module connector, take a test light lead and connect to the positive battery post, touch the probe tip to the purple/white wire at pin c and simulate the signal closely enough that the computer thinks it is the same thing. The ecm is just looking for a signal voltage. It has no idea where it came from.

I just find that interesting. Comes in handy at times as well. You can use that same method to simulate a pickup coil signal to the module in an old HEI distributor system.
Back to the problem at hand. We want to know that the wires from the injectors to the ecm are good. These injectors are bank fired. One bank is triggered by the dark blue wire at ecm pin C11. The other by dark green at pin C12. Since we have power to the injectors on the pink/black wire with the key on then all we have to do to see that the wiring is intact to the ecm is to use the test light at C11 and C12 to verify the circuit. The lamp should light. It does. At this point the Alldata tree suggests replacing the ecm. Before doing that I would suggest testing ecm powers and grounds. Another glaring hole for me is that I have not looked at sensor datastream or engine codes. It is very possible for a sensor to cause no injector pulse as part of a programming design. For instance, a throttle position signal that indicates full open throttle on crank and the car will go into clear flood mode with no injector signal. A coolant temperature signal that indicates extremely hot conditions can cause the ecm to lean the fuel mix so much that there is little or no injector signal. Now every computer circuit can be tested at the ecm with a scope or meter but it is time consuming and what you really want to know here won't be found that way. What you want to know falls into the strength area of a scan tool. You want to know what the ecm thinks the sensor data is, what it thinks the voltages are on its connector circuits. That tps signal could be perfectly normal tested with a meter but it is possible for the ecm to be misreading the signal and that is what you can see with a scan tool datastream. So before replacing this ecm we'll look at powers, grounds, datastream and codes. One more thing, we need to test the resistance of the injectors while the no-start is present. A shorted injector could shut down the driver circuit.
I don't see any problems so we'll do the ecm swap. It is fairly simple. The ecm is behind the glove box but I already have it out for testing access. Just disconnect the wiring, remove the access cover. You need to remove the PROM from the old ecm and put it into the new. It contains the programming information for the particular car.


Now back in the olden days (heh, heh), I would check the PROM for available updates. We had no flash PROM then. Read the scan tool PROM ID or use the physical number on the PROM and check in the manual. AXAU 9718 is the PROM number and is the latest update for this application. Good thing because I doubt new PROMs for these old cars are still available.
I got the ecm connected and the car cranked right up. Just button it all up and we're done. Thanks for reading and hanging out with me. I hope you learned that even though we made modifications to the published diagnostic procedures and streamlined things a bit to get a result quicker, we were still doing the same thing. Following a trouble tree of our own design to approach the problem in a logical manner. That's what it is all about.
Kenneth Hayes
AKA Deranger
Sunday, May 09, 2010
Duct tape Datsun... Early morning de-"Light"
Another story from my best selling book
Hey Look I Found The Loose Nut
availabe from Amazon.com, Borders, or at my website www.gonzostoolbox.com where you'll find even more stories and even more things to do.
A few years ago a nurse dressed in her scrubs came into my Tulsa auto-electric shop early one afternoon. She had just finished her morning shift at the hospital. She told me that things were kind of tight at her house financially, and she didn’t have a lot to spare for car repairs. I told her I would help her out as much as I could.
Her problem was that her headlights didn’t work, and she really needed to take her old Datsun (Dats before Nissan) to work in the early morning hours, regardless whether or not she got a ticket for having no headlights. She explained that she had to leave for work at ‘Oh-dark-thirty,’ as we used to say in the Marines, so I was thinking she had some sort of lighted route that would keep the prying eyes of the law off her tail.
“I get the picture, Ma’am. I’ll take a look at it,” I said.
Now I’m no car snob but I was genuinely suprised at how decripit this has-been automobile she was driving was. It should have been crushed years earlier, although it looked pretty much all biodegraded already—completely rusted and dented up with not much left of the interior. But as it was, this was this nice lady’s only ride to-and-from work. Yes, she would wait to see what I found.
Rather than surveying the outside any longer than necessary, I popped the hood and got right to work on finding the problem. It wasn’t that hard to find. At the positive battery post on this type of car was a series of fusible links that powered up different systems in the car. One of them was corroded off the terminals. It just so happened to be the one that powered the headlights.
I grabbed the trusty baking soda and cleaned off the crud from the positive post of the battery. After replacing the corroded end of the fusible link, I attached it back onto its proper post. One flick of the headlight switch and she was in business.
I went into the lobby and told the nurse, who was waiting anxiously, what I had found. I told her that it was going to be a cheap fix, and not to worry about having to get a car-fix loan (as she had worried aloud to me). I then asked her how long had she been driving around with no headlights.
She told me with an air of satisfaction, “Oh, I had headlights all the time. I just wanted the factory ones to work because I was getting tired of changing the batteries in the other ones.” Say what?
Factory ones? Batteries? What other ones? Did I miss something?
I just stared at her for a few seconds. I thought that by now I was pretty good with electrical systems. What did I miss on this old Datsun’s electrical schematics that involved alternate headlights that she was aware of, but I wasn’t?
“Really?” I said. “Can you show me what you are talking about?”
We walked out to the car and there on each edge of the front bumper were two 9-volt flashlights duct-taped around the bumper with what could have been a whole roll of tape. She walked up to them and pushed the button on each of the right and left flashlights. Then she turned around to face me with both arms out stretched like a TV ad model; pointing one toe and all. And wouldn’t you know it… she’s got headlights, sort of.
“I just thought it was going to cost so much to fix them that I have been putting it off for months,” she said. “But I had to buy so many batteries I thought it would be cheaper to find out what was really wrong with the factory ones.”
Now I’ll admit I’ve never seen duct-taped flashlights attached to a bumper before. And I haven’t seen them since... But I’ll tell you this, if I’m ever in need of a nurse in an emergency, who can get the job done till the cavalry comes, she is my choice. Way to go girl. You got my vote for duct-tape engineer of the month.
Hey Look I Found The Loose Nut
availabe from Amazon.com, Borders, or at my website www.gonzostoolbox.com where you'll find even more stories and even more things to do.
A few years ago a nurse dressed in her scrubs came into my Tulsa auto-electric shop early one afternoon. She had just finished her morning shift at the hospital. She told me that things were kind of tight at her house financially, and she didn’t have a lot to spare for car repairs. I told her I would help her out as much as I could.
Her problem was that her headlights didn’t work, and she really needed to take her old Datsun (Dats before Nissan) to work in the early morning hours, regardless whether or not she got a ticket for having no headlights. She explained that she had to leave for work at ‘Oh-dark-thirty,’ as we used to say in the Marines, so I was thinking she had some sort of lighted route that would keep the prying eyes of the law off her tail.
“I get the picture, Ma’am. I’ll take a look at it,” I said.
Now I’m no car snob but I was genuinely suprised at how decripit this has-been automobile she was driving was. It should have been crushed years earlier, although it looked pretty much all biodegraded already—completely rusted and dented up with not much left of the interior. But as it was, this was this nice lady’s only ride to-and-from work. Yes, she would wait to see what I found.
Rather than surveying the outside any longer than necessary, I popped the hood and got right to work on finding the problem. It wasn’t that hard to find. At the positive battery post on this type of car was a series of fusible links that powered up different systems in the car. One of them was corroded off the terminals. It just so happened to be the one that powered the headlights.
I grabbed the trusty baking soda and cleaned off the crud from the positive post of the battery. After replacing the corroded end of the fusible link, I attached it back onto its proper post. One flick of the headlight switch and she was in business.
I went into the lobby and told the nurse, who was waiting anxiously, what I had found. I told her that it was going to be a cheap fix, and not to worry about having to get a car-fix loan (as she had worried aloud to me). I then asked her how long had she been driving around with no headlights.
She told me with an air of satisfaction, “Oh, I had headlights all the time. I just wanted the factory ones to work because I was getting tired of changing the batteries in the other ones.” Say what?
Factory ones? Batteries? What other ones? Did I miss something?
I just stared at her for a few seconds. I thought that by now I was pretty good with electrical systems. What did I miss on this old Datsun’s electrical schematics that involved alternate headlights that she was aware of, but I wasn’t?
“Really?” I said. “Can you show me what you are talking about?”
We walked out to the car and there on each edge of the front bumper were two 9-volt flashlights duct-taped around the bumper with what could have been a whole roll of tape. She walked up to them and pushed the button on each of the right and left flashlights. Then she turned around to face me with both arms out stretched like a TV ad model; pointing one toe and all. And wouldn’t you know it… she’s got headlights, sort of.
“I just thought it was going to cost so much to fix them that I have been putting it off for months,” she said. “But I had to buy so many batteries I thought it would be cheaper to find out what was really wrong with the factory ones.”
Now I’ll admit I’ve never seen duct-taped flashlights attached to a bumper before. And I haven’t seen them since... But I’ll tell you this, if I’m ever in need of a nurse in an emergency, who can get the job done till the cavalry comes, she is my choice. Way to go girl. You got my vote for duct-tape engineer of the month.
Sunday, May 02, 2010
Stories from my book "Hey Look, I Found The Loose Nut"
Bottom Shocker:
A customer called [my auto electric shop] and said he just purchased a car from the police auction, but it had some sort of strange noise coming from the driver’s side electric seat. It seems every time he moved it there was a strange electrical sound. He thought there was something wrong with the seat motor.
He was coming to me, an auto electric technician, to get it fixed.
“Sure,” I said. “What kind of car is it?”
“It’s a Peugeot,” he answered.
I’m not much on Peugeots, but I told him I could take a quick look at it and see if I could do anything for him.
A day or so later the car arrived at the shop. After pulling it into a bay I tried the driver’s seat. Sure enough, as you moved the seat forward an inch or two, a horrible loud buzzing of electricity emanated from under the seat. Rolling the seat back would stop the noise. Well then, what to do? I rolled the seat forward to the spot that made the noise. It seemed to be pretty consistent, same place, same noise. When I moved the seat to the spot that made the noise I got out of the car and looked underneath. The noise immediately stopped … nothing, not a whisper of any strange noise or buzzing.
The car had an all black interior, black seats, black carpet; even the seat rails and brackets were solid black. It looked fine to me. Of course it’s still a Peugeot, and I just don’t go poking my head under Peugeot seats every day, so I must’ve been missing something.
I rolled the seat forward and back several times and still no noise. What in the world was going on?
I called over my helper and told him “Listen to this, see what you think.” The noise was gone. I explained to my helper what had happened. He was at a loss. I climbed back in the car and, sure enough, as long as I was sitting in the seat, it would make the noise. Getting back out of the car and trying it, nothing. Sit in the car and the noise happened every time. This is ridiculous. I heard the sound myself and I’m not going crazy, am I?
I got out again, but this time I had my helper get in and move the seat. He moved the seat forward and within a few inches it starting making the noise. I told him to lift his butt out of the seat…the noise stopped immediately. He tried several times. I tried a couple of times. We didn’t think anything of it. Actually, we were having fun with it. One of us would sit in the seat and make a fake pistol with our fingers as if we were shooting each other. Raise and lower our butts in and out the seat and play like we were Buck Rogers or something.
“OK, enough fun, sit back down,” I said, “I’ll look underneath this time.” I got down to where I could look under the seat at about the same time he was putting his weight back into the cushion. Then I saw the problem. Oh my! I had to look again and again just to make sure I was seeing what I thought I was seeing.
My helper asked: “What is it?” with great surprise and anticipation. As I looked underneath the seat I could see a perfect bluish white lightning bolt glow about an inch or so long. It was pointed right at the bottom of the cushion but only a fraction of an inch from the metal bracing of the seat.
In a very calm voice I told him, “Now listen carefully, I want you to raise your butt out of the seat, and I’ll move the seat towards the rear. There is a police taser pointing at your keister right now. Move very carefully, and I don’t think you’ll get shocked.”
I think it shook him up a bit. But he carefully lifted his weight out of the seat. The taser was the exact same color as the carpet and under side of the seat. It was so well camouflaged that it appeared to a part of the seat mechanism. If it wasn’t for the lightning bolt, I don’t think anyone could have spotted it. It really looked like a part of the seat brackets. After moving the seat back, the taser eased off of the button and came back to rest with the business end pointing harmlessly away from his “derriere.”
I then reached under the seat and pulled the butt buzzer out from under the seat. I called the customer and told him what I found. To say the least he was shocked.
So were we for that matter… well, almost.
A customer called [my auto electric shop] and said he just purchased a car from the police auction, but it had some sort of strange noise coming from the driver’s side electric seat. It seems every time he moved it there was a strange electrical sound. He thought there was something wrong with the seat motor.
He was coming to me, an auto electric technician, to get it fixed.
“Sure,” I said. “What kind of car is it?”
“It’s a Peugeot,” he answered.
I’m not much on Peugeots, but I told him I could take a quick look at it and see if I could do anything for him.
A day or so later the car arrived at the shop. After pulling it into a bay I tried the driver’s seat. Sure enough, as you moved the seat forward an inch or two, a horrible loud buzzing of electricity emanated from under the seat. Rolling the seat back would stop the noise. Well then, what to do? I rolled the seat forward to the spot that made the noise. It seemed to be pretty consistent, same place, same noise. When I moved the seat to the spot that made the noise I got out of the car and looked underneath. The noise immediately stopped … nothing, not a whisper of any strange noise or buzzing.
The car had an all black interior, black seats, black carpet; even the seat rails and brackets were solid black. It looked fine to me. Of course it’s still a Peugeot, and I just don’t go poking my head under Peugeot seats every day, so I must’ve been missing something.
I rolled the seat forward and back several times and still no noise. What in the world was going on?
I called over my helper and told him “Listen to this, see what you think.” The noise was gone. I explained to my helper what had happened. He was at a loss. I climbed back in the car and, sure enough, as long as I was sitting in the seat, it would make the noise. Getting back out of the car and trying it, nothing. Sit in the car and the noise happened every time. This is ridiculous. I heard the sound myself and I’m not going crazy, am I?
I got out again, but this time I had my helper get in and move the seat. He moved the seat forward and within a few inches it starting making the noise. I told him to lift his butt out of the seat…the noise stopped immediately. He tried several times. I tried a couple of times. We didn’t think anything of it. Actually, we were having fun with it. One of us would sit in the seat and make a fake pistol with our fingers as if we were shooting each other. Raise and lower our butts in and out the seat and play like we were Buck Rogers or something.
“OK, enough fun, sit back down,” I said, “I’ll look underneath this time.” I got down to where I could look under the seat at about the same time he was putting his weight back into the cushion. Then I saw the problem. Oh my! I had to look again and again just to make sure I was seeing what I thought I was seeing.
My helper asked: “What is it?” with great surprise and anticipation. As I looked underneath the seat I could see a perfect bluish white lightning bolt glow about an inch or so long. It was pointed right at the bottom of the cushion but only a fraction of an inch from the metal bracing of the seat.
In a very calm voice I told him, “Now listen carefully, I want you to raise your butt out of the seat, and I’ll move the seat towards the rear. There is a police taser pointing at your keister right now. Move very carefully, and I don’t think you’ll get shocked.”
I think it shook him up a bit. But he carefully lifted his weight out of the seat. The taser was the exact same color as the carpet and under side of the seat. It was so well camouflaged that it appeared to a part of the seat mechanism. If it wasn’t for the lightning bolt, I don’t think anyone could have spotted it. It really looked like a part of the seat brackets. After moving the seat back, the taser eased off of the button and came back to rest with the business end pointing harmlessly away from his “derriere.”
I then reached under the seat and pulled the butt buzzer out from under the seat. I called the customer and told him what I found. To say the least he was shocked.
So were we for that matter… well, almost.
Friday, April 30, 2010
Thump! Oh crap, another one. PDR can Fix it!

Thursday, April 29, 2010
Quickie: 002

2002 Dodge Grand Caravan 3.3
The complaint is an MIL on. The first step to find what causes an MIL is to get the stored trouble code. This one is P0456. A small leak detected in the evaporative system.
Where would you start? You start with an inspection of the gas cap and check the gas cap seal for cracks. Underhood you should inspect the evap hoses for cracks, especially any rubber hoses that fasten to plastic or steel tubing. There, near the throttle body is a small leak in the rubber hose where it fastens to the plastic tube. Under car look for the same sort of cracks. Another hose was cracked near the canister.
It only takes some careful inspection.
Kenneth Hayes
deranger@ipa.net
Quickie: 001

1998 Buick Century 3.1M
The complaint is long crank time on a start, black smoke once started and stalling at low engine speeds.
Where would you start?
Pull the vacuum hose from the pressure regulator and look for signs of fuel. There should be no sign of fuel at the vacuum port. If there is fuel the regulator is bad and extra fuel is being pulled into the engine.
The MIL is also on so trouble codes should be checked. If caused by the fuel problem they can be cleared after the repair.
P0172 indicates a rich fuel condition
P0300 indicates rough engine running
P1133 indicates too little activity from the O2 sensor
All those were probably set by the fuel problem but we should watch the O2 activity after the repair to verify the sensor is good.
That is about as easy as it gets.
Kenneth Hayes
Tuesday, April 27, 2010
GM Flashing 3
GM and the Snapon Pass Thru Pro II
We'll continue from our previous posts on flashing GM. In part 1 we established an account and subscription on the GM server. In part 2 we used that subscription, an IBM Thinkpad laptop and the Cardone Flash2 All-Makes Reprogrammer to perform a PCM calibration update on a 2002 Chevy Malibu. In part 3 we'll replace a faulty PCM with a remanufactured unit and do a fresh programming install using the Snapon Pass Thru Pro II.
I have the Snapon software installed on a Toshiba laptop running Vista. Make sure the Snapon J2534 device is connected to the pc. Test the vehicle battery. Replace or charge as needed. Remember the battery needs to remain between 12.5 and 14 volts during the process. Connect the Pass Thru Pro II to the OBDII connector under the dash and open the flash program on the pc. Choose "flashing" and GM. Choose "GM J2534 Website" and log on to your account. Read the terms and conditions and choose "accept". Choose "service and programming information". Choose "TIS2 Web Service Programming". You will probably see the news available message. Click "ok". Choose "Service Programming System". Click "start SPS" and cross your fingers. Hah, it worked! Click "skip". Choose the tool you are using. In this case, J2534 PassThruPro. Choose "replace and program ECU". Now even if you are going to replace a module other than a PCM don't let ECU throw you off. You would still make this choice. Choose "next". Follow the instructions, turn the key on. Click "next". "Chevrolet", "2004", "LD Truck", "Trailblazer EXT", "5.3". Click "next". You should see the vin retrieved. This one did not retrieve so we will enter the vin. Be sure it is entered correctly. The next screen then shows you all the possible modules you can "replace and program". So lets choose "next".

Now choose PCM, Normal and "Next". Turn off the key and replace the PCM. I turn the charger off at this time as well. I like to get the PCM up into an area where I have good access and that is possible here without too much trouble. These things are buried sometimes.

Loosen the hex head bolts in the center of each connector and you can remove the wire connectors from the PCM. There are weather seals at each connector and they tend to stay with the PCM so be sure you put them back on the connectors before fastening them to the new computer. Speaking of weather sealers... when I disconnected the wiring from the PCM I noticed a drop of water. You should always give things a closer look so:


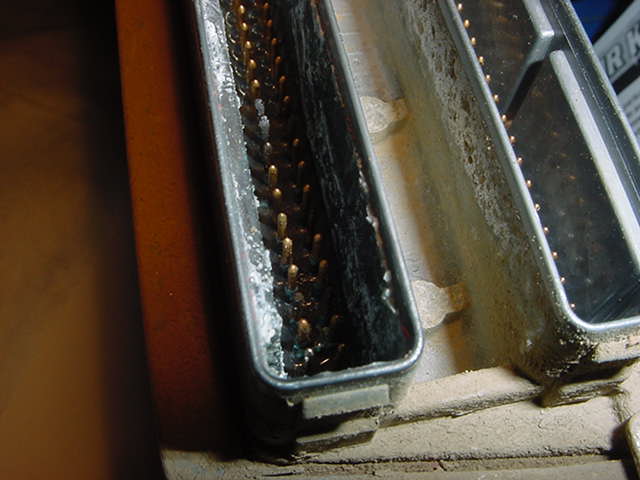 There is water standing in the area around the PCM pins and a lot of corrosion damage. Now I am not surprised the vin could not be retrieved. The fault causing me to replace the PCM was that it could not read the correct O2 sensor output for Bank1 Sensor1. I'm surprised now that it could do much of anything correctly. Now we'll want to clean the female terminals in the connectors very carefully before installing them on the replacement PCM. We don't want any of the corrosion to remain. We'll also need to figure out what allowed the water in and what we can do to prevent this happening again.
 Now before we put the connectors onto the replacement PCM we want to look at all the pins to make sure they are all straight and in good condition. A pin slightly bent can quickly become broken when you push a connector in place and pull it down with the hex bolt. This looks good so lets get it installed.
Ok, charger back on. Key on. Click "next" and hope I haven't timed out my GM server connection. Looks good. A calibration for the new PCM shows up. Select that and click "next". A description of the programming about to be installed.

Click "next". Instruction to remove #19 and #51 fuses from the rear fuse block. Ok. Click "next". We are programming. Done. We may have to relearn crankshaft position. We need to turn off the key and put the fuses back in. Exit the Snapon software. Make sure I am clear under the hood for an engine start. Turn off the charger. Disconnect the J2534 device from the vehicle.
The engine starts but there is a security light and service engine light. Now I remember there could be a code for the crank relearn but there isn't. There is a U0107 for a data problem between the PCM and the Throttle Control. There is a P1626 security code. When I clear the codes the truck will not restart. We can do a security relearn and should get a start. It goes like this:
Turn the key on, engine is off. Turn the key to start and release to on. The truck won't start. When the security light goes OFF, turn the key off. Wait 5 seconds and do all that again exactly the same way two more times. After the third time the key is off and you have waited the 5 seconds it should start on the next crank.
It worked except I finally gave up on the security light going off that third time and tried it anyway. I cleared codes and no lights have returned. I just need to test drive tomorrow after getting the PCM back in place. If no more lights pop on I'll wrap it up by seeing what I can do to prevent any more water damage.
Whew! I love my job!
Kenneth Hayes
AKA Deranger
Sunday, April 25, 2010
GM Flashing 2
Cardone Flash2 All-Makes Reprogrammer and GM
We'll continue the GM Flashing from part 1. You should now have a GM server account and a current subscription. You'll need those to access the GM software to allow the flash to be done. Your pc will link you to GM and your J2534 device will link your pc to the GM vehicle. There are minimum pc requirements for the GM applications and the Cardone Flash2. You should check that your pc meets those. I'm using an old IBM Thinkpad w/XP Pro that works fine. I was happy to see that because it was an ebay purchase for $200. A very inexpensive investment.
The Cardone Flash2 software comes with installation instructions and I'd say it is idiot proof since I had no particular problem with it.
I do remember that after the software install I had problems with the Flash2 being recognized by the pc until I realized the Flash2 must be powered up (connected to the car obdII connector or to the a/c adapter) before opening the Flash2 program.
Now once you get the pc ready and the J2534 device ready, you have to get the car ready. You must have a good battery on the car and it must be fully charged. Test the battery. If it is bad, replace it. If it needs a charge, charge it. It has been my own experience that even with a good, fully charged battery most cars won't maintain voltage in the correct range throughout the programming process without some help. Many technicians use a booster pack connected to the battery and have good results with that. I've had better results with a charger connected and running at low charge. I should say at this point that the Cardone Flash2 instructions say do not leave the charger connected to the vehicle. I commonly get several interruptions during a flash session that extend the key on time. I also find complications arise in the process itself that extend key on time. Using a battery with a booster and no charger left me aborting the flash several times in a session to recharge the battery. Weighing the options I decided to start leaving the charger on low and have never had a problem from that. I can't say every charger would be fine to use. I suspect some would be a bad idea. Take a look at this 2002 Malibu charging system noise with engine running and alternator doing the work:

Now look at this from the shop charger on the 2 amp maintainer setting:
 The 10 amp setting has about twice the a/c noise as the alternator output but this 2 amp setting keeps the battery up and is a very clean output. Does any of that matter? I'm not sure but it does work so I'm staying with it.
 Now lets get started making all this work together. I'll turn the charger on the 2 amp maintainer setting. The pc is up and running. You should cancel automatic updates and any automatic shutdown you may have set. It is best to have your reprogramming pc do only that. You don't want it to be doing software updates, checking email or running other activities at the same time as you are performing a flash.
Make sure the usb cable from the Flash2 is connected to the pc. Connect the Flash2 data cable to the car's OBDII connector under the dash. Double-click the Flash2 icon on the desktop. The disclaimer screen will come up. If you agree to not hold Cardone responsible for anything you tear up then you click "agree". Click the GM icon in the OEM Reprogramming section.
 At the next screen choose Flash2 Reprogramming.
  On the next screen there is a choice to do the flash on-car or off-car. If you have purchased the extra leads you can flash an ecm with no car involved. I use the off-car for the convenience of other shops. They can bring me the ecm they need flashed and keep the car in their own shop. As long as the ecm is the same part number I can even reprogram a used module to work on a different vehicle. It is very easily done with most GM vehicles. For my own non-professional customers I prefer to do a flash on-car. Sometimes you need to be able to access more than one module and sometimes other issues arise such as security relearns. I think of it like this, I used to repair and overhaul carburetors. Actually I still do but it isn't very often any more. When a customer brings in only the carb for repair they can't get a complete job. With the complete car I can see that the carburetor is properly removed, installed, make adjustments and address any issues the car may have that affect the carb operation such as a misfire or vacuum leak. An off-car ecm flash is similar to that, the job can need further work to be complete.
 Our volunteer vehicle for the example will be a 2002 Malibu w/3.1 engine. We'll choose on-car reprogramming. The next screen contains warnings such as no charger connected, disable popup blocker, close other programs, check connections, etc. Pay attention to the warnings and use good judgement. Click "next" when ready and you will be asked to turn the ignition on. Click "ok" when that is done. The next screen will allow a battery test to determine if voltage is in range for the flash procedure. The test can be skipped but I recommend it. The battery should be at least 12.5 volts and no more than 14 volts. The test will give the voltage reading and a pass or fail result. Because the car has automatic headlamps and they are on with the ignition key we get a "fail" message.

If I disable the automatic headlamps and wait a couple of minutes I get a "pass" but the voltage is at the minimum allowed.

Now I could crank the charger up a notch but since it is a controversial issue anyway I chose to add a booster pack to the mix. With the charger on 2 amp, a booster pack connected and the auto headlamps disabled I have a 12.8 volt battery test result so we'll click "next". A few more important instructions to read through and then we'll click "next" again. Choose GM or Saturn. We'll choose GM. Choose cd/dvd or web link. We are using the web link. After clicking "next" the GM server screen will come up and you can enter your user name and password. Scroll to the bottom of the "terms and conditions", choose "accept" and click "continue". Click "service and programming information". Click "TIS2 Web Service Programming". I always get a message popup that says there is unread news. Click "ok". Choose Service Programming System on the left of the next screen. Another popup, whatever is a current news message. Click "ok". Now always read your instructions that come up on each screen, especially when you are new to the process. On this next screen click "start sps".
SPS is a java program so make sure you have a late version of java installed. If your version is too old it won't work. Sometimes it doesn't work anyway.
 I could dress this all up but it would be dishonest. The truth is that flashing can be very frustrating and is not for the faint of heart. Occasionally things go very smoothly, more often they do not. Now this could be a java error or a problem with my own computer. It could be a problem with the GM side of the application. "Details" is meaningless jargon to me so first a reboot is tried with no help. Next a system restore to a couple days earlier. That didn't work either. Uninstalling Java and then reinstalling Java did the trick.
Once the SDS application loads you will be offered an installation for Tech2 GM scan tool, skip that step. Select the J2534 device and choose either to reprogram an existing module or to replace and reprogram a different module. If you choose the first option you can only reprogram if an update exists. The second option allows programming over any current program.
In this case we will be updating a current module.
In the next few screens we'll select make, model year, vehicle type and make. The pc will communicate with the ecm and determine the vin. Check that the vin stored and communicated matches the vin of the car. The pc will check with the GM server and return a list of modules you can access. In this case it is only the PCM. Select programming type "normal" and click "next". A wealth of information is on the next screen. You can see the current PCM calibration is 12218554. You can see several calibration updates in history and what those updates were for. You can see that an update is available for the car. Update calibration 12588232 is to correct a misfire at 70 mph.
 Select 12588232 and click "next". You'll see a brief summary of the situation.
What you see next is a visual of the reprogramming process. The update has been downloaded from the GM server to the pc and now the pc is loading the updated programming into the ECU through the J2534 Flash2 device. It is a very critical time. I had the pc lock up once during this process and destroy a PCM. I had to replace it. The programming had not proceeded far enough that the PCM would re-establish communication.

Once the programming is complete you'll see any specific instructions that may apply to the system. This one may need crankshaft variation relearned or set code P1336/P0315. If on restart I see this code then I will know to perform a crankshaft relearn.
We are done with the GM server and can cancel, returning to the Flash2 pc software to exit. The Flash2 software will ask us to leave the J2534 device connected for 30 seconds for a final burn of the new programming. Just follow the instructions. Now before exiting the software completely we can verify the new programming calibration using "analyze" mode.
 Notice the calibration is now 12588232 or the most current available at this time. We have verified the flash was successful. We aren't done yet. Let's turn off the charger, disconnect the booster pack, replace those automatic headlamp relays and see if the car starts. Eureka! Sometimes a security relearn has to be done before the car will start. This one started fine so we want to notice if the Service Engine light is off. Remember we were warned there may be a crankshaft relearn to be done. Not in this case. The light is off and we are finished. There that wasn't so bad. It always feels good when you are done. I hope this gave you a good idea of what is involved in a flash session and what can happen. Next we'll cover a GM flash using the Snapon J2534 device, Pass Thru Pro II if there is interest.
Kenneth Hayes
AKA Deranger
Friday, April 23, 2010
Preventative Maintenence-do you do it based on miles or hours or both?
This week Pat Goss discusses why Preventative maintenence should be done based on Time and not Mileage. Listen to the audio clip below.
GM Flashing

GM Flashing with Cardone Flash2 All Makes Reprogrammer
You'll need to set up an account on the GM server and then get a current TIS2 Web subscription. Go to http://www.acdelcotds.com/acdelco/action/subscribehome
The Cardone Flash2 is a J2534 device so choose subscribe now under that option.
 I should mention that no matter what brand of J2534 device you use you will need to use these steps to establish the GM TIS2 Web account and flash GM vehicles. After the Subscribe Now you'll be sent to the login page. If you have no account then choose "click here" and follow instructions to set up an account. Login and password are case-sensitive so be aware of that.
Once the account is setup you'll get an email to verify and then can access your new account from the Login page. After the login you'll be directed to the "terms and conditions of use" page. If you scroll, at the bottom is a choice to accept and then to continue. Now that you have an account you'll need a subscription. If you accepted the use terms and clicked on continue you should be at a page that allows you to choose "Service Information" (GM may make changes to the site so this can only be a guide at best). Choose "Subscribe Now" for J2534 reprogramming, choose your subscription type and follow the instructions. You'll get a confirmation email. Once the subscription is current you are ready to use the Flash2 or other J2534 device.
Watch for part 2 in this series. We'll need to get the Flash2 up and running.
Kenneth Hayes
AKA Deranger
Friday, April 16, 2010
Alignments- What you need to know about them.
This week pat Goss talks about alignments, when you need them, what type and maybe you don't need one when you think you do. Learn how to shop smart when looking for a good alignment. Listen to the audio clip below as he explains all this.
Friday, April 09, 2010
Hey Look! I found the Loose Nut!

This week on the lighter side of Automotive repair we have an interview that Pat Goss did with the author of the book"Hey Look! I found the Loose Nut!" In this book the author Scott "Gonzo" Weaver Gives us a humorous look at what goes on at a repair shop. This book will make you take a second look at how you've been treating your automobile repairman. "Gonzo" runs a repair shop in Oklahoma and is seen in his very own chat room found off his web page at http://gonzostoolbox.com/ on Sunday evenings 7:00pm CDT.
BTW: Gonzo has joined our mailing list here on carfix_online a few weeks ago.
BTW: Gonzo has joined our mailing list here on carfix_online a few weeks ago.
Friday, April 02, 2010
Subscribe to:
Posts (Atom)