GM and the Snapon Pass Thru Pro II
We'll continue from our previous posts on flashing GM. In part 1 we established an account and subscription on the GM server. In part 2 we used that subscription, an IBM Thinkpad laptop and the Cardone Flash2 All-Makes Reprogrammer to perform a PCM calibration update on a 2002 Chevy Malibu. In part 3 we'll replace a faulty PCM with a remanufactured unit and do a fresh programming install using the Snapon Pass Thru Pro II.
I have the Snapon software installed on a Toshiba laptop running Vista. Make sure the Snapon J2534 device is connected to the pc. Test the vehicle battery. Replace or charge as needed. Remember the battery needs to remain between 12.5 and 14 volts during the process. Connect the Pass Thru Pro II to the OBDII connector under the dash and open the flash program on the pc. Choose "flashing" and GM. Choose "GM J2534 Website" and log on to your account. Read the terms and conditions and choose "accept". Choose "service and programming information". Choose "TIS2 Web Service Programming". You will probably see the news available message. Click "ok". Choose "Service Programming System". Click "start SPS" and cross your fingers. Hah, it worked! Click "skip". Choose the tool you are using. In this case, J2534 PassThruPro. Choose "replace and program ECU". Now even if you are going to replace a module other than a PCM don't let ECU throw you off. You would still make this choice. Choose "next". Follow the instructions, turn the key on. Click "next". "Chevrolet", "2004", "LD Truck", "Trailblazer EXT", "5.3". Click "next". You should see the vin retrieved. This one did not retrieve so we will enter the vin. Be sure it is entered correctly. The next screen then shows you all the possible modules you can "replace and program". So lets choose "next".

Now choose PCM, Normal and "Next". Turn off the key and replace the PCM. I turn the charger off at this time as well. I like to get the PCM up into an area where I have good access and that is possible here without too much trouble. These things are buried sometimes.

Loosen the hex head bolts in the center of each connector and you can remove the wire connectors from the PCM. There are weather seals at each connector and they tend to stay with the PCM so be sure you put them back on the connectors before fastening them to the new computer. Speaking of weather sealers... when I disconnected the wiring from the PCM I noticed a drop of water. You should always give things a closer look so:


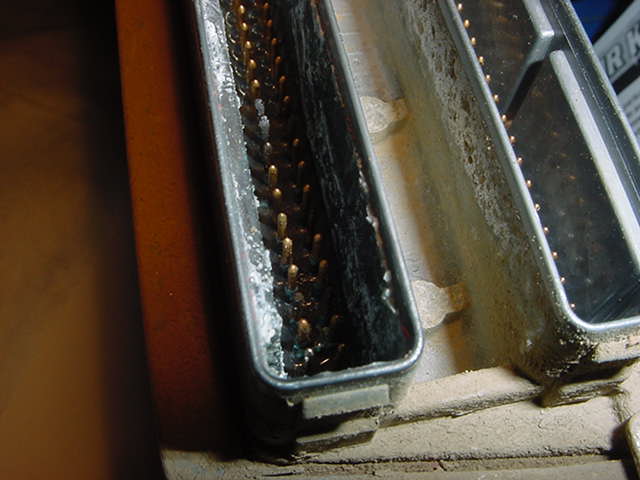 There is water standing in the area around the PCM pins and a lot of corrosion damage. Now I am not surprised the vin could not be retrieved. The fault causing me to replace the PCM was that it could not read the correct O2 sensor output for Bank1 Sensor1. I'm surprised now that it could do much of anything correctly. Now we'll want to clean the female terminals in the connectors very carefully before installing them on the replacement PCM. We don't want any of the corrosion to remain. We'll also need to figure out what allowed the water in and what we can do to prevent this happening again.
 Now before we put the connectors onto the replacement PCM we want to look at all the pins to make sure they are all straight and in good condition. A pin slightly bent can quickly become broken when you push a connector in place and pull it down with the hex bolt. This looks good so lets get it installed.
Ok, charger back on. Key on. Click "next" and hope I haven't timed out my GM server connection. Looks good. A calibration for the new PCM shows up. Select that and click "next". A description of the programming about to be installed.

Click "next". Instruction to remove #19 and #51 fuses from the rear fuse block. Ok. Click "next". We are programming. Done. We may have to relearn crankshaft position. We need to turn off the key and put the fuses back in. Exit the Snapon software. Make sure I am clear under the hood for an engine start. Turn off the charger. Disconnect the J2534 device from the vehicle.
The engine starts but there is a security light and service engine light. Now I remember there could be a code for the crank relearn but there isn't. There is a U0107 for a data problem between the PCM and the Throttle Control. There is a P1626 security code. When I clear the codes the truck will not restart. We can do a security relearn and should get a start. It goes like this:
Turn the key on, engine is off. Turn the key to start and release to on. The truck won't start. When the security light goes OFF, turn the key off. Wait 5 seconds and do all that again exactly the same way two more times. After the third time the key is off and you have waited the 5 seconds it should start on the next crank.
It worked except I finally gave up on the security light going off that third time and tried it anyway. I cleared codes and no lights have returned. I just need to test drive tomorrow after getting the PCM back in place. If no more lights pop on I'll wrap it up by seeing what I can do to prevent any more water damage.
Whew! I love my job!
Kenneth Hayes
AKA Deranger