Use this blog to share items of interest to those on the carfix_online mailing list. Note: Video and audio clips are not to be reproduced, duplicated, copied, for sale, trade, resell or exploit for any commercial purposes. If you like what you see here, why not Join our group at groups.io/g/carfixonline
Thursday, April 29, 2010
Quickie: 001
Tuesday, April 27, 2010
GM Flashing 3

Now choose PCM, Normal and "Next". Turn off the key and replace the PCM. I turn the charger off at this time as well. I like to get the PCM up into an area where I have good access and that is possible here without too much trouble. These things are buried sometimes.
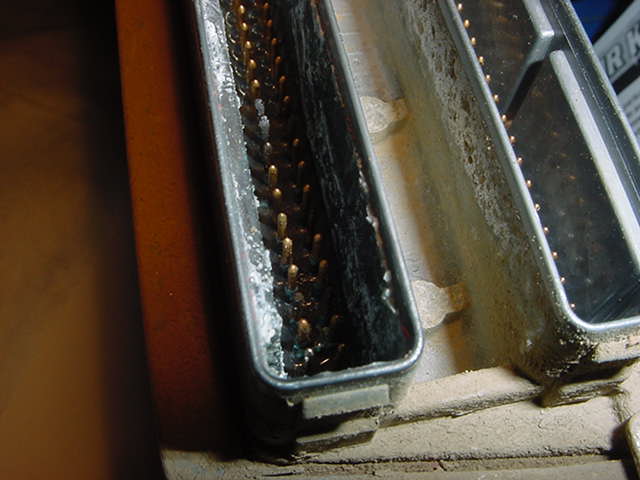
Loosen the hex head bolts in the center of each connector and you can remove the wire connectors from the PCM. There are weather seals at each connector and they tend to stay with the PCM so be sure you put them back on the connectors before fastening them to the new computer. Speaking of weather sealers... when I disconnected the wiring from the PCM I noticed a drop of water. You should always give things a closer look so:
Sunday, April 25, 2010
GM Flashing 2

The 10 amp setting has about twice the a/c noise as the alternator output but this 2 amp setting keeps the battery up and is a very clean output. Does any of that matter? I'm not sure but it does work so I'm staying with it. 
If I disable the automatic headlamps and wait a couple of minutes I get a "pass" but the voltage is at the minimum allowed.

Now I could crank the charger up a notch but since it is a controversial issue anyway I chose to add a booster pack to the mix. With the charger on 2 amp, a booster pack connected and the auto headlamps disabled I have a 12.8 volt battery test result so we'll click "next". A few more important instructions to read through and then we'll click "next" again. Choose GM or Saturn. We'll choose GM. Choose cd/dvd or web link. We are using the web link. After clicking "next" the GM server screen will come up and you can enter your user name and password. Scroll to the bottom of the "terms and conditions", choose "accept" and click "continue". Click "service and programming information". Click "TIS2 Web Service Programming". I always get a message popup that says there is unread news. Click "ok". Choose Service Programming System on the left of the next screen. Another popup, whatever is a current news message. Click "ok". Now always read your instructions that come up on each screen, especially when you are new to the process. On this next screen click "start sps".
SPS is a java program so make sure you have a late version of java installed. If your version is too old it won't work. Sometimes it doesn't work anyway.
I could dress this all up but it would be dishonest. The truth is that flashing can be very frustrating and is not for the faint of heart. Occasionally things go very smoothly, more often they do not. Now this could be a java error or a problem with my own computer. It could be a problem with the GM side of the application. "Details" is meaningless jargon to me so first a reboot is tried with no help. Next a system restore to a couple days earlier. That didn't work either. Uninstalling Java and then reinstalling Java did the trick.
What you see next is a visual of the reprogramming process. The update has been downloaded from the GM server to the pc and now the pc is loading the updated programming into the ECU through the J2534 Flash2 device. It is a very critical time. I had the pc lock up once during this process and destroy a PCM. I had to replace it. The programming had not proceeded far enough that the PCM would re-establish communication.

Once the programming is complete you'll see any specific instructions that may apply to the system. This one may need crankshaft variation relearned or set code P1336/P0315. If on restart I see this code then I will know to perform a crankshaft relearn.
We are done with the GM server and can cancel, returning to the Flash2 pc software to exit. The Flash2 software will ask us to leave the J2534 device connected for 30 seconds for a final burn of the new programming. Just follow the instructions. Now before exiting the software completely we can verify the new programming calibration using "analyze" mode.
Notice the calibration is now 12588232 or the most current available at this time. We have verified the flash was successful. We aren't done yet. Let's turn off the charger, disconnect the booster pack, replace those automatic headlamp relays and see if the car starts. Eureka! Sometimes a security relearn has to be done before the car will start. This one started fine so we want to notice if the Service Engine light is off. Remember we were warned there may be a crankshaft relearn to be done. Not in this case. The light is off and we are finished. There that wasn't so bad. It always feels good when you are done. I hope this gave you a good idea of what is involved in a flash session and what can happen. Next we'll cover a GM flash using the Snapon J2534 device, Pass Thru Pro II if there is interest.
Kenneth Hayes
AKA Deranger
Friday, April 23, 2010
Preventative Maintenence-do you do it based on miles or hours or both?
GM Flashing
I should mention that no matter what brand of J2534 device you use you will need to use these steps to establish the GM TIS2 Web account and flash GM vehicles. After the Subscribe Now you'll be sent to the login page. If you have no account then choose "click here" and follow instructions to set up an account. Login and password are case-sensitive so be aware of that. Once the account is setup you'll get an email to verify and then can access your new account from the Login page. After the login you'll be directed to the "terms and conditions of use" page. If you scroll, at the bottom is a choice to accept and then to continue. Now that you have an account you'll need a subscription. If you accepted the use terms and clicked on continue you should be at a page that allows you to choose "Service Information" (GM may make changes to the site so this can only be a guide at best). Choose "Subscribe Now" for J2534 reprogramming, choose your subscription type and follow the instructions. You'll get a confirmation email. Once the subscription is current you are ready to use the Flash2 or other J2534 device.
Watch for part 2 in this series. We'll need to get the Flash2 up and running.
Kenneth Hayes
AKA Deranger
Friday, April 16, 2010
Alignments- What you need to know about them.
Friday, April 09, 2010
Hey Look! I found the Loose Nut!

BTW: Gonzo has joined our mailing list here on carfix_online a few weeks ago.
Friday, April 02, 2010
Thursday, April 01, 2010
Chrysler's new Transmission the "Turboencabulator"

Friday, March 26, 2010
Checking the Headlights and repairing them
Friday, March 19, 2010
What causes cooling system overheating
Friday, March 12, 2010
Automotive Terms, Myths & Don't Do's
Sunday, March 07, 2010
Diesel caravan continued from last week-Fixing the injector pump!
Next Part:
Friday, March 05, 2010
Pat Goss on why rotors get warped
Click on the image below then open to listen.
Tuesday, March 02, 2010
Removing/Replacing the diesel caravan motor (Parts 1-6)
All parts are shown here in this blog(Parts 1 through 6)
Remove diesel caravan motor Part I
Remove diesel caravan motor Part II
part III: Remove 3.0 engine for a diesel conversion
Part IV: Here is where he Starts the vw diesel motor on a chain
Part V: Diesel vw motor is installed into a caravan
part VI: my diesel is leaking, HELP ME !
Friday, February 26, 2010
Tom Torbjornsen-with some winter tips!
Friday, February 19, 2010
Did You Know that being stuck in the snow causes fluid oxidation?
This week Pat Goss tells us what can happen to your transmission fluid when your stuck in the snow and you spin your wheels! Listen to the clip below as he explains the relationship of oxidation of the fluid and how it increases with temperature, as you spin faster to get out of the snow and what you should do to prevent this.Tuesday, February 16, 2010
Official Toyota recall notice- Updated 02/05/2010
Safety Recall (Special Service Campaign) – A0A
Accelerator Pedal Modification Campaign Vehicles Equipped with Accelerator Pedals Manufactured by CTS Corporation
http://cid-e9d50e31a0403643.skydrive.live.com/self.aspx/carfix%5E_online/toyota%5E_recall.pdf
Friday, February 12, 2010
What to do If you experience Sudden Acceleration
Tuesday, February 09, 2010
Lauren Fix with more car tips!
Friday, February 05, 2010
Lauren Fix on Wiper blades

Lauren Fix is a Buffalo, New York based journalist and a former race car driver, and was one of the co-hosts Talk 2 DIY Automotive on DIY, providing demonstrations and tips for auto repair.
From what I gathered Fix is her real last name and she is often called "The Car Coach" .The picture above is taken from her book she recently wrote.
Friday, January 29, 2010
A bazaar concept- "Winter Tires"
Friday, January 22, 2010
How to use Chevron Techron to clean your fuel injectors

Some methods of cleaning fuel injectors can be too aggressive and actually
cause damage to the injectors if not used properly. Below is a listed process, that is fairly straight forward and easy to perform.
You will most likely notice an improvement in performance and fuel economy.
2. Run your fuel tank down to just below ¼ tank.
3. At the gas station add 1 full bottle of Techron to your tank and fill up with
premium fuel.
4. Run that tank of premium fuel down to a ¼ tank.
5. Fill up again with a second full tank of premium, with NO Techron.
6. Let the second tank of premium fuel run down to a ¼ tank.
7. Now add the second full bottle of Techron to your tank along with a third tank of
premium fuel.
8. Let the third tank run down to about ¼ tank to get the full strength of the
Techron past the injectors before filling up again.
Friday, January 15, 2010
Changing a V-belt- (Unconventional)
How to determine the correct amount of air to put into your tires
Saturday, January 09, 2010
Automotive MythBusters-The Automotive Tune-Up(Parts I & II)
Another in the series of "Myth busters" from Dave Rock. Here he does a pretty good job of explaining what he sees in the term "Tune -Up". Does he get it all right? You be the judge and send your comments to the mailing list.Note: This is only Part I so it ends abruptly. Part II is shown below Part I.
Click on the video below for Part II:
Tuesday, January 05, 2010
How to unclog a heater core to get good heat.

Comments? Send them to the mailing list as always!
Friday, January 01, 2010
Do you know the difference between exclusionary and inclusionary warranties?

"Myth Busters"- Batteries!

In this video Dave Rock started a new series of what he calls "Myth Busters". So far he has one on Motor oils, Cooling systems and this one I am showing here on Batteries. The main reason I decided to go with this one, is that the information is more accurate from what I can tell!
As always, find something he shows that is not up and up send your comment(s) to the mailing list.
Monday, December 28, 2009
Why so much to fix my Heat?
Subject Vehicle is a 2003 Dodge Ram 1500 Pick-up Truck.
The Customer concern was that the Heat did not work right.
Upon inspection we found that the Airflow was way out of kilter.
When checking we found that there was only a very small of air coming out of the Defrost Duct and Floor Duct, all the time, even with the Blower on High! It didn't even try to change when any of the other Modes were selected.
And the air was barely luke-warm.
When troubleshooting this fully Electronically Controlled HVAC Systems' Controls, it was determined that the Defrost/Floor Mode Door was unresponsive, probably a broken Door as this is a Common Problem on this Year/Make/Model (Y/M/M) . In fact, ALL of the Mode Doors on this Y/M/M have a history of breakage but the Def/Floor Door is the most common and Dodge has upgraded the Door and Lower case.
Further testing revealed that the Heater Core was also internally restricted.
OK, so far these findings explain the Def/Floor not changing and the air not being heated enough but we still didn't know why the airflow was so weak and farther testing was getting us nowhere.
We filed a claim with the Warranty Company and asked them to leave the Claim "open" because we would need to perform more inspection and testing when we got the HVAC Case out and dis-assembled.
This is not the correct illustration for this Y/M/M but's the only one I could find on short notice. It does give a good idea about the airflow through a typical HVAC Case thugh.
The entire Dash, instrument Panel and Steering column need to removed to gain access to the Case.
After that we still had work to remove the Case.
If you look at the top-right you'll be able to see the plastic simply snapped at the upper hinge.
And what about that pesky low airflow condition? Well, the other broken Door was the Fresh air/Recirculation Door. When broke, it fell down onto the Blower Motor inlet effectively sealing out nearly any air intake at all. Sorry I didn't get a pic of that one, had to get back to work...
Oh yeah, why did I mention that this particular Warranty Company just makes things worse?
Because these Y/M/M has known problems with this issue *and* this Vehicle obviously will break the other Doors in the future it would be just plain SMART to replce ALL of the Doors now while it is apart and save any future costs of the high labor bill to do this again.
They denied the claim for the other doors "because they are not broken"
And the Customer did not want to pony-up the bucks either because it would be covered again by the Warranty Company.
SHEESH!!! What a waste of money when the others fail...
Enjoy,
Mike.
Michael E. Nixon All rights reserved
Friday, December 25, 2009
Do you ever think about your tires?
Friday, December 18, 2009
New- MICHELIN® Smart Jumper Cables

MICHELIN Smart Jumper Cables automatically adjust polarity which means you can connect the clamps to either positive or negative connections. Conventional jumper cables require that the clamps are specifically connected to the positive and negative battery terminals. Failure to properly attach conventional jumper cables can result in sparking, shorting, exploding batteries, engine fires, and expensive electrical system damage.
The auto polarity adjustment is performed by five circuits – two voltage polarity recognition circuits (one for the battery to be rescued; the other for the battery providing the power supply) a logic recognition circuit, a driving circuit and a relay switching circuit.
• The voltage polarity recognition circuits recognize polarity then send a signal to the logic recognition circuit.
• The logic recognition circuit receives the polarity information then sends a control signal to the driving circuit.
• The driving circuit receives the logic recognition signal and in turn drives the relay switching circuit.
• The relay switching circuit enables the two batteries to be accurately coupled. In the event the system detects a connection problem, this circuit switches off the current conductors for safety.
Friday, December 11, 2009
How to plug a leaking car tire
Friday, December 04, 2009
Paintless Dent Removal Scam
Friday, November 27, 2009
Tom Torbjornsen- Engine Rebuilding Facility
Tom Torbjornsen , host of "America's Car show" visits an engine rebuilding facility in his hometown. He shows us a few tidbits on what goes on there!
Friday, November 20, 2009
A "safe" sealer for your A/C?
Friday, November 13, 2009
Motor oil- difference between house brands and major brands

Thursday, November 12, 2009
2003 Kia Rio clutch replacement lesson from Dave Rock
As always, comments are welcomed on the mailing list!
Friday, November 06, 2009
What exactly is Hypermiling?

What exactly is Hypermiling? It is all about making adjustments to increase your gas mileage. Listed below are some Hypermiling Techniques that would do just this - no matter what car you are driving.
Friday, October 30, 2009
Chrysler Wi-Fi Hotspot Announced
The U.S. Manufacturer's Suggested Retail Price (MSRP) for the router module is $449. Autonet Mobile offers wireless Internet account service at $29 a month, available in 12-, 24- and 36-month service plans. There is a one-time $35 service activation fee. Uconnect web will be powered by Autonet Mobile, and will be available in August as a dealer-installed Mopar accessory.
Friday, October 23, 2009
Testing for Parasitic Drain
Hi all! 10/23/09
I checked-in to the list today at lunch time and saw a few replies about my suggestion
to use an ammeter instead of a test light when testing for a parasitic drain on a battery.
I learned this lesson the hard way almost thirty years ago.
You see, I was trying to diagnose why a certain Oldsmobile was having the Battery
run-down every 3 or 4 days.
Following the conventional wisdom of the era, I had a test-light installed in series between
the battery and a disconnected cable.
The Lamp glowed brightly!
I proceeded to follow conventional wisdom (again) by pulling one fuse at a time until the
test-light went out.
Eureka! That fuse was for the Rear Suspension Load Leveling feature, really nothing
more than Air Shocks, a Compressor, Height Sensor and Module.
OK, now what?
I re-installed the fuse and the light was brightly lit again.
Thinking the most logical failure would be the Module itself, I disconnected it.
Lo and Behold! The light went out! Yay!!!
After replacing an expensive Module I retested again with the Test-Light.
To my horror it was brightly lit!
Disconnecting the new Module made the light go out again!
After my steaming bright red face explained this to the shop owner, he handed me
the phone number to a brand-new (to me) service. A technical hot-line for Auto
repair mechanics.
Now remember this was almost thirty years ago, electronics were just beginning to
to become "the force" that they are today.
The consultant politely listened to my dilemma and then asked one solitary question.
"Why are you using a test light"?
He explained that this particular Module needs to have FULL voltage and current in order
to settle the rear suspension to the proper height before it will shut-down and go to sleep.
With a test-light in series this could never happen. He suggested I retest using an Ammeter
and wait for five minute to see what would happen.
Well, needless to say, the system leveled and shut-off.
No more drain!!!
I've used an Ammeter ever since for this test!
After seeing today's replies I decided to put together a quick blog showing this phenomenon
on a typical car we had in the bay.
It is a 1999 Chevy Malibu, 3.1L engine, Auto Trans.
It was not in for any sort of Battery problem so I knew it would be a perfect candidate.
I was able to do these tests and take the pics in-between jobs and waiting for parts.
In the first pic you'll see I have test-light in series with the Battery.
You'll also observe that the Light is lit brightly even though the flash of camera almost
drowned it out.
After 15 minutes IT WAS STILL BRIGHTLY LIT!!!
(remember to click on the image for a larger view)
Hmm....
Now that's interesting!
Now let's see what happens when I use the Ammeter in my Fluke 88 DMM
The drain started out high, about 300 mA (0.3 Amps) then within about a minute fell
to what you see, 62 mA (0.062 Amps).
I now know for sure that this car DOES NOT have an issue with parasitic drain on the
battery.
If I had *trusted* the test-light method I would have wasted a great deal of time and
parts money and maybe even risked the trust of a customer.
Michael was asking about using an inductive Amp Clamp to get a quick idea about the
possibility of too much parasitic drain.
First you would not be able to trust an Amp Clamp that measures anything over about
10A.
The one I use is this:

It is a *Low Current* probe capable of measuring very low Amperage's.
I use it primarily for use with an oscilloscope to measure Fuel Injector, Fuel Pump, Ignition
Primary events.
It is fast enough and accurate enough to give me good results.
To use it you connect it's leads to your DMM or Oscilloscope and convert it's output to Amps.
The problem with using it for parasitic drain testing is it's "nose size".
I can't fit it around most battery cables...
If you would like to peruse this tool more you can go to http://aeswave.com/Products
/Product.asp?i=59 for more info.
All in all there are many myths that can get you trapped in a diagnostic boondoggle that
does nothing but cost you time and money.
Hopefully I've been able to clear up at least one of them with this post...
Master Nimrod,
Mike.
SuperBumper!
Friday, October 16, 2009
Technical info on oil burning and head gaskets( "Sleuth" affair)
and sign up. We are always taking in new members!
Most of the information he gives is true, but he tries to over simplify one specific test. Can you identify it?
Friday, October 09, 2009
A 1959 Chevrolet Bel Air crashes into a 2009 Chevrolet Malibu
Highway Safety (IIHS), a 1959 Chevrolet Bel Air was crashed into a
2009 Chevrolet Malibu—in a head-on frontal-offset test, at 40 mph.
Watching the modern Malibu, the hood area deforms
significantly but the passenger area looks almost entirely intact. Shift your eyes over to the 1959 Chevy and it’s the stuff of old highway-safety and shock-and-scare films, just melodrama and implied gore. There’s plenty of car gore though, with the Bel Air’s steering column slammed forward into the driver, the A-pillar completely mangled, and the dash pushed back to finish the punch. Trim pieces fly, shards of non-safety-glass fly forward, and…well, that’s probably enough of a spoiler.
In case there’s any doubt based on the description above, according to safety engineers at the scene, the driver of the 2009 Chevrolet Malibu would likely have suffered slight knee injury. The driver of the 1959 Chevrolet Bel Air would have died instantly.
Friday, October 02, 2009
Belt wear Gauge for Serpentine belts
Since the late 1990s, auto manufacturers have phased out Neoprene belts and begun installing EPDM (Ethylene Propylene Diene Monomer) belts on new models.
EPDM is a superior technology with better performance characteristics but, like any wear part, these belts don’t last forever. It can be harder to detect when these new belts are worn, because as EPDM belts age, they don’t show wear the same way as Neoprene.
To help you accurately diagnose belt wear in EPDM belts, Gates has developed a Belt Wear Gauge so you can determine the appropriate time for belt replacement. Order one free at
http://www.gatesprograms.com/beltwear/beltwear_gauge_thank_you
See the video on how to use this belt gauge at..
http://www.brentonftp.com/video/twoguys/flv/player.php?movie=Gates_Belts_807
Friday, September 25, 2009
How to remove clearcoat paint scratches from your automobile
Friday, September 18, 2009
Tire Pressure Monitoring systems with Goss & Davis
Friday, September 11, 2009
RE: Bad fuel filters causing check engine light to come on
We see a lot more fuel filter problems. For one thing the ethanol attracts and absorbs water to the fuel system which in turn causes corrosion on metal parts. Ethanol can also strip minuscule particles of plastic from the surface of plastic fuel tanks and parts. Both problems are especially bad if the driver does not use Isopropyl alcohol dry gas to control moisture.
But the larger issue is that ethanol is hygroscopic so there is more water in most fuel tanks. Some water can be absorbed into the gasoline but some will settle to the bottom of the tank. When water is present there will usually be growth of micro organisms such as water bottom blooms, mold, fungus, bacteria and algae that live in a mostly anaerobic state in petroleum products. They are water or airborne and enter through vents, condensation or with fuel from underground storage tanks.
These life-forms mostly live in the water at the fuel-water junction layer and feed on hydrocarbons in the fuel or starch-like substances in the ethanol. Some create hair-like mats on tank bottoms, others are slimy and are suspended from the fuel at the fuel-water interface. Like all living things they produce waste which causes sludge, acids, and other nasty stuff that can damage fuel system parts.
These organisms reproduce at an astounding pace but as individuals are short lived and quickly die. Because they are microscopic they and their excrement can pass through the sock on the end of the fuel pickup tube but are trapped in the fuel filter's much finer pores. This is what makes the average fuel filter look muddy. Again, ethanol comes from a starch and offers a potentially better food source for a wider variety of micro life-forms. More critters means more dead carcasses and more poo which means shorter fuel filter life.
Also when too much moisture accumulates in the tank it can lead to phase separation of the ethanol causing damage to both metal and plastic. The residue from this reaction clogs filters as does the rust from the moisture reacting with metal parts.
In the past we had much less of this. Although MTBE was hazardous to us it didn't cause nearly the problems to the cars that we see with ethanol.
Thursday, September 03, 2009
What is this?

Scroll down for the answer!
The answer!
A Vibrating Reed Tachometer: Which is a tachometer consisting of a group of reeds of different lengths, each having a specific natural frequency of vibration; observation of the vibrating reed when in contact with a moving mechanical device indicates the frequency of vibration for the device.